
If you’re anything like me, you appreciate the satisfaction that comes with creating sharp, clean, and permanent marks on metal. Whether it’s for branding, compliance, or just personalizing a project, having the right tools makes a world of difference. That's exactly why I’m excited to share my go-to electrochemical etching kit that completely transformed my workflow—and it’s all thanks to the awesome team over at Electro-Chem Etch.
In this post, I’ll walk you through what comes in a complete etching kit, how I use it, why I love their electrochemical etching stencils, and why it’s perfect for professionals and serious hobbyists like me here in California.
What Is Electrochemical Etching?
Before I dive into the kit, let me explain what electrochemical etching is—just in case you're new to it. Electrochemical etching (also called electrolytic etching) is a process that uses electricity and an electrolyte solution to permanently mark metal surfaces. It's widely used in industries like aerospace, medical, tools, and even custom knife making.
I personally use it to brand my stainless steel tools and equipment. It's fast, clean, and leaves a permanent, corrosion-resistant mark without damaging the material.
What’s Inside the Complete Electrochemical Etching Kit?
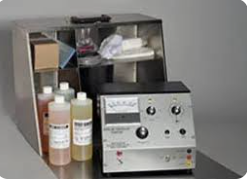
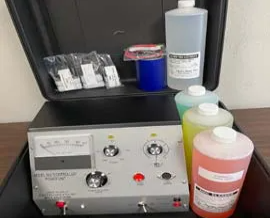
When I first opened my kit from Electro-Chem Etch, I was impressed with how comprehensive it was. Everything was neatly packed and ready to go. Here’s what came in my electrochemical etching kit:
Power Unit: The heart of the system. Mine came with variable settings that allowed me to etch different metals precisely.
Etching Head & Handle: This is what makes contact with the stencil and surface.
Electrochemical Etching Stencils: These were custom-made with my logo, and I also got a few blank options.
Electrolyte Solution: Specially formulated for different metals. I chose the one for stainless steel.
Neutralizer: To stop the reaction and protect the finish.
Application Pads: These help with even electrolyte distribution.
Cleaning Supplies: To prep and polish the metal before and after etching.
Instructions & Safety Guide: Super helpful, even for someone with experience.
Everything I needed was in one box—plug, prep, and etch!
Why I Love This Kit
I’ve used several setups in the past, piecing them together from different sources. But let me tell you—having a complete, professional-grade kit made specifically for electrochemical etching was a total game-changer. Here’s why I’m all in:
✅ Ready Out of the Box
No more hunting for parts or wondering which electrolyte to use. The kit had everything I needed and worked right away.
✅ Clean, Professional Results
My etch marks are crisp and consistent every single time. Whether I’m working on polished stainless or something with a matte finish, it looks clean and lasts.
✅ Safe & Easy
With proper guidance included, even a beginner could learn the ropes. And for those of us in California—where environmental concerns are huge—I was glad to see how safe and non-invasive the electrolyte solution was.
Custom Electrochemical Etching Stencils: My Favorite Feature
Now, let’s talk stencils. The electrochemical etching stencils I got with my kit were outstanding.
Why I Love Them:
Crisp, Reusable Designs: Perfect for branding tools or creating compliance marks.
Custom Logos: I had mine made with my initials and business name. It gives my work that pro finish!
Variety of Sizes: Whether I’m marking something large or tiny, there's a stencil for that.
Durability: I’ve reused the same stencil dozens of times without loss of quality.
Having custom stencils has allowed me to leave a signature mark on every item I etch. That’s priceless.
How I Use the Electrochemical Etching Kit
You don’t need a lab or workshop to get started. I run my setup from a small workbench in my garage. Here's how I typically use my kit:
Clean the Metal Surface
I wipe down the area to remove oils and dust. This is key to getting a clear etch.
Apply the Stencil
I secure my electrochemical etching stencil using tape or stencil adhesive.
Soak the Application Pad
Just a bit of electrolyte is enough. I don’t overdo it.
Etch
I place the head of the applicator over the stencil and hold it for a few seconds. The current does the magic!
Neutralize
This stops the reaction and prevents any corrosion.
Clean and Polish
The final result always leaves me impressed—clean, permanent, and professional.
Where I Got It – Electro-Chem Etch
Let’s be honest: there are a lot of etching kits out there. But Electro-Chem Etch has over 40 years of experience, and it shows. Their products are:
Made in the USA 🇺🇸
Backed by knowledgeable support
Trusted by the aerospace and medical industries
Perfect for hobbyists and professionals alike
When I had a few questions before ordering, their customer service team took the time to guide me through the options. That kind of support is rare these days.
Etching in California: Why This Kit Works for Me
As a California-based maker, I face unique challenges—tight environmental regulations, limited workspace, and the need for fast turnaround. This kit checks all the boxes:
Compact and portable
Eco-conscious supplies
Reliable performance for client projects
Whether you're working out of a studio in LA or a garage in the Bay Area, this kit fits right in.
Getting my hands on a complete electrochemical etching kit was one of the best decisions I’ve made for my craft. It’s streamlined my workflow, elevated the look of my products, and made me proud to put my name—literally—on everything I make.
If you're in the market for high-quality electrochemical etching stencils, a reliable etching system, or just want to mark your metal like a pro, I wholeheartedly recommend checking out Electro-Chem Etch. Their kits are built for people like us—those who care about precision, presentation, and permanence.
Thanks for reading—and if you have any questions, feel free to reach out. I love connecting with fellow makers, especially here in the Golden State!


Write a comment ...